Showing posts with label Tips and Tricks Thursdays. Show all posts

Thursday, February 16, 2012

Tips and Tricks Thursday! Manual mode {East Idaho photographer}


Tips and Tricks Thursday 


Can you believe it is Thursday again? I think every week goes by faster and faster. I hope that you've been out there playing with your camera and its settings. I hope last weeks lesson helped you to understand ISO a little bit better. I used the ISO function a lot in my recent ballerina session. We shot inside a dance studio and  part of the session I used only my flashes. To capture movement I had to crank my ISO way up in order to get a high enough shutter speed. Today we will discuss how aperture and shutter speed work hand in hand with ISO to get the proper exposure.  

Chapter 2: Manual Mode Settings

Part C: Aperture, Shutter Speeds, and ISO- hand in hand

I know we have touched briefly on aperture and shutter speed separately but today I want to explain how they go hand in hand with ISO.

If your camera will allow you to set both aperture and shutter together you will be able to have better results in proper exposure of your images. Before we talked about using TV (S) and AV (A) modes but that only allowed you to set one or the other but not both together. Both work hand in hand. If any of you have seen me during a session you have seen my fingers moving constantly on my camera. This is due to changing the shutter or aperture or both to get different effects on what I'm trying to achieve. I also change my focal points constantly and I will explain that more next week. 

But first, lets talk about your camera and how to tell when you are properly exposed. If you look in your eye piece you should see down at the bottom a bunch of lines with an arrow in the middle.  When you dial either your aperture or shutter you should see a blinking, thicker line that moves as you dial. The goal is to get the blinking, thicker line lined up in the middle. All camera's are different in what you see in your eye piece but they are all very similar. 

Here is an example of the back of a Canon XSI. The red circled area is what you should see inside your camera when you look through the eye piece. 

The dark, thicker line is right in the middle, which means this image should be properly exposed. Now there are situations, especially on a bright sunny day when that middle point will change depending on where your focus is. But we will get into that in a later lesson. For now we will just work on getting a properly exposed image by making sure that darker line is lined up in the middle. 

The most important thing to do when you are changing both the shutter and the aperture is to think about what you are attempting to capture. 

I will give some examples...

Example 1: Action 


Lets say you are wanting to capture movement. It could be a sport image, children playing, an animal moving, etc... If you want to capture the image without a lot of blurring then you would want to set the shutter speed first. With any type of movement you want to have a shutter speed of 250 or higher in order not to get blur. In sports the higher the better. But often times in sports you are in an inside building with not a lot of light. Then you have to really work at getting the proper exposure using your f-stops and ISO. To do this, you would set your shutter to 250 and then a higher ISO (because that will allow a little more light to filter in even with a  quick shutter) and then using the dial, change your f-stops until the dark line is centered in the middle.  Now be careful too because the lower the f-stop number the more depth of field you will get and the less will be in focus. If you are wanting to capture a couple basketball players going up for the basket you would want them to be in focus. So you would need to maintain a higher f-stop of 6.3 or higher. If you were to only use a 4.0 or even lower, only the spot where your focal point is will be in focus. If you are unable to get a higher f-stop centered in the middle, then crank up the ISO even more. 
  
Here is an example from a recent session I did. I wanted to keep a little motion going in her skirt as she twirled, but I kept the focal point on her face so that her face stayed in focus. Because I wanted only her face to be in focus I was able to keep the f-stop a little lower. But also notice my ISO is cranked to 1600, which will create noise. But I didn't mind the noise. I think it adds to the feel of the image.  

Here are my camera settings... ISO 1600, Shutter 250, F-stop 5.6


Example 2: Big depth of field

You want to really focus on the subject, but blur out the background. This would be helpful for images where there is a lot going on in the background, like a child playing at a playground with multiple other children. Or a detail that you want to single out in the image. If you are wanting a big depth of field, you want to start by setting your f-stop. The lower the number the more depth of field you will have. Every lens is different on how low you can go on your f-stops. But depending on how much of a depth of field you want depends on how low you go. Once you set your f-stop than dial the shutter speed until it reaches the center of the line.


Here is an example from the same session using the low f-stop to capture a good depth of field. 


My camera settings are:


ISO 500, Shutter 100 and F-stop 4.0


Example 3: Group shots 


What if you want EVERYTHING in focus in the image? Great example of this is if you are doing a group shot. You don't want just one person in focus. You'll want everyone in focus. So in order to achieve this you need to have a higher f-stop. If you are shooting 4 or more people you will want to have your f-stop 8.0 or higher. When I shoot a wedding and do group shots, I will keep my F-stop at 10 or higher just to make sure everyone is in focus. Do not use a low F-stop on group images or you will be disappointed. Also watch your shutter speeds. Anything lower than 125 can be tricky with a group shot. Good rule of thumb with hand holding a camera is never go lower then 80 shutter speed. With 60 and lower try to use a tripod to keep your camera steady or you will get blurring.  


Here is an image I did this past fall for a family. 


My settings were: ISO 640, Shutter 160, and F-stop 8.0.
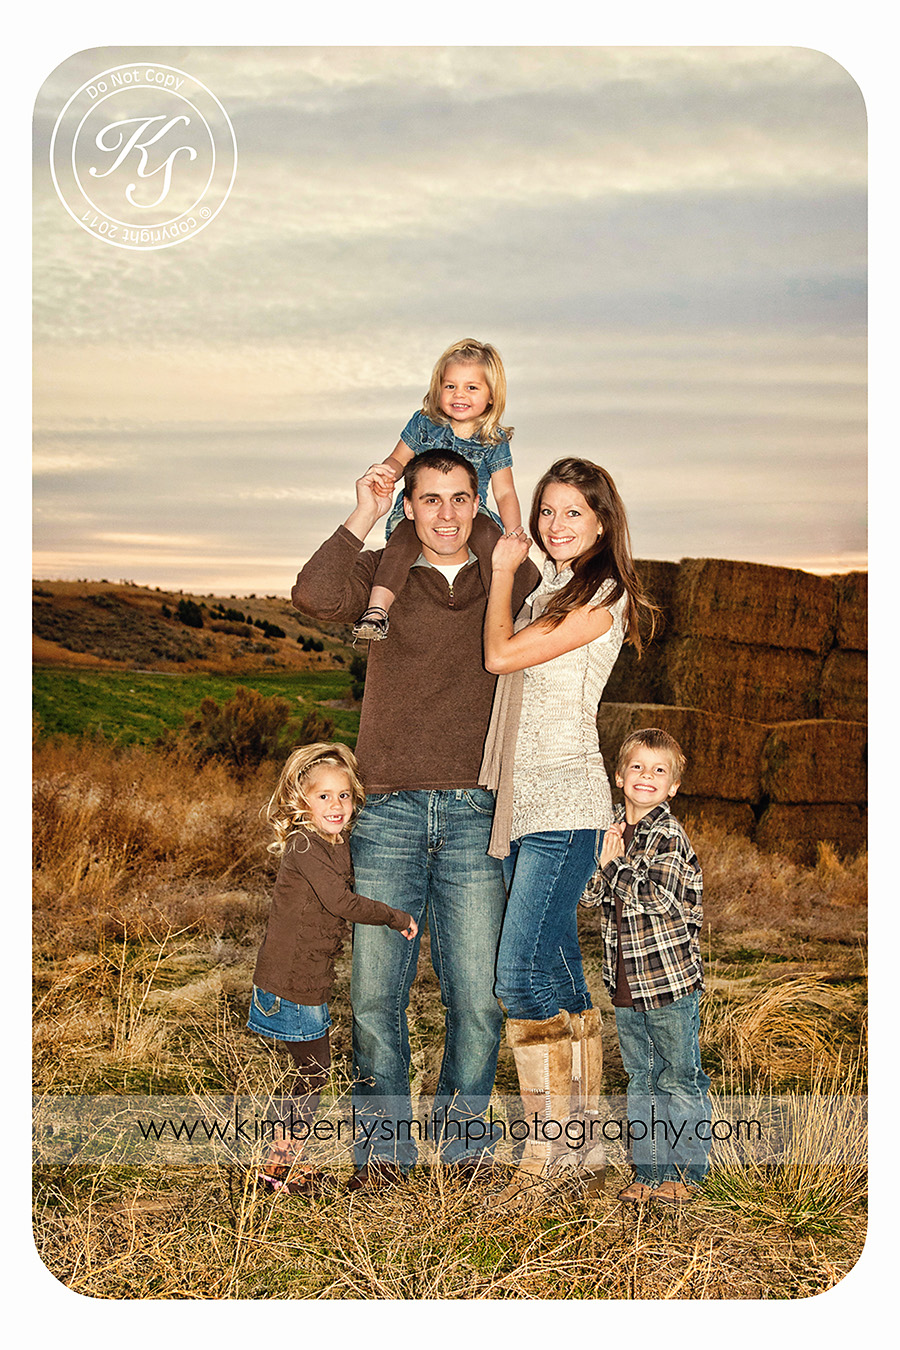

Notice how everyone is in focus. When I am shooting any group I want to make sure that they are all in focus. 

Example 4: Landscape and wildlife images

 When trying to figure out your settings for landscape or wildlife images make sure to be aware of movement, lighting, whether you want it to be all in focus or if you want a particular thing in focus. Determine what you are looking for and then set your settings accordingly. If it is a bright day and you want it all in focus you may end up setting your shutter speed high, your f-stop high and your ISO low. If it is an overcast day and not very bright, you will want a lower shutter speed but a middle f-stop (8.0+) to still keep everything in focus and adjust ISO accordingly. If you are shooting wildlife that is moving you need to have a high shutter speed to capture the movement and a middle ground F-stop (8.0+) and then change ISO to get it exposed properly. 

Here is an image using the example of high shutter, high f-stop and low ISO. This image was taken last month in Kentucky. I absolutely LOVE old barns and silos. This silo was so cool I just HAD to take a picture of it. 

My settings were- shutter 1000, f-stop 9.0 and ISO 320.


So, as you can see from this lesson, in order to fully shoot manual and get AMAZING pictures, you need to know how shutter, aperture and ISO all work together to create a correctly exposed image. Now get out and go try it out. Put it on manual and dial away!!! The more you do it the more it'll make sense. And the more you do it, the more it becomes second nature. I don't even "think" about it now. I just start turning dials. And so can you!!!

As always... if you have any questions feel free to leave a comment here or on our business Facebook page! Good luck!!!


Thursday, February 9, 2012

Tips and Tricks Thursday! Manual mode- ISO {East Idaho photographer}

Tips and Tricks Thursday 

So I just realized I totally spaced posting last week. I had just returned from my FUN trip to Nashville, Tennessee and Kentucky and I got so busy with my kids, house work, and clients that I forgot to post! Sorry for those of you who are following this every week. I will try to be better. :) 

Chapter 2: Manual Mode Settings
Part B: ISO

Today I want to discuss ISO. What it is and how to use it.

Unless you've used film in the past, you probably don't know what ISO is and how it effects your photographs. ISO stands for International Organization for Standardization. In relation to photography, it essentially means your film speed. Film Speed is the amount of light that is needed to properly expose your film or image.  
Even though your camera is probably not film but is digital, the ISO camera setting still has the same function as older film camera's. Camera ISO determines how sensitive the image sensor is to light. 
If you go to any store and pick up a roll of film, you'll notice a number on the package. Generally it will be 100, 200, 400, or 800. That's the ISO number. The lower the ISO number the more light it will need to penetrate the film for proper exposure. 800 ISO film requires a lot less light to expose your picture properly than film with an ISO of 200.

 Depending on your digital camera model you may have ISO settings that range even higher than 800. My camera can go to 3200 and the Canon 5D MarkII can go to 25600. 
If you are unsure where to find the ISO settings on your camera, check out your owners manual. Most digital camera's now will allow you to set your own ISO. And if you know where it is to change it, you will have more control in different lighting situations. 

The general rule of thumb- The lower ISO settings (100-400) are for daylight and situations where there is a lot of light. And the higher the ISO settings (800+) are for night and low light situations.

Here is a quick reference guide for ISO settings...


  •       Use an ISO of 100 or 200 when taking photographs outside in sunny conditions.
  •     If the sky is overcast or it is evening time, then use an ISO within the range of 400 to 800.
  •     Night time or in cases of low light you might need to set your digital camera ISO to 1600 or higher if your camera will allow you to go higher. If you don't, then your photo will appear too dark, if at all.
How does the ISO speed affect the photographs end result? 


If you set your digital camera to a low ISO, for example 100, the resulting photograph will be better quality than one set at 1600. The higher the ISO the more grainy the photo will look. I suggest going for a low ISO number whenever possible.
However there are circumstances where a lower quality photograph is better than none at all. For example, trying to take a picture in the evening when the sun is setting and there isn't very much natural light left.  I had the opportunity to go to Grand Turks on one of our cruise ports last November and as I was headed back to board the cruise ship I wanted to get a shot of the ocean and an old dock. It was about 5:30 pm and there was hardly any light left. I cranked my ISO to 3200 and was still able to get enough light in to get the shot. The image is grainy, but I was still able to capture it. Here are the results...
This was shot with very little light using an ISO of 3200. By using the high ISO I was able to get a little more light into the sensor but the result is a grainy image. Having grain in the image was worth it to get this amazing shot of the clouds, sunset and water. 


When you use your digital SLR camera in automatic modes such as portrait, landscape and sports etc, all basic settings like ISO, Aperture and Shutter speed are automatically made for you. There are times when you'll want to override these automatic settings and choose the ISO yourself.

When to use the ISO setting on a digital SLR camera

  • If you want to ensure the highest quality photograph possible. 
The lower the ISO the better the quality. An ISO of 100 or 200 will give you a better quality photograph than one set at 1600. If the image is destined for website display, then this may not matter. However, if you wish to print the photograph, then you'll want to keep the ISO low. Otherwise it will look grainy or noisy (as it is also refered to). 


  • If you want to take a photograph in dark situations and not use a tripod.
 For example, if you are on a tour through a mountain cave or at a fish aquarium, a tripod may not be an option. In these cases, you could up your ISO to at least 800 or more. This way, your camera will automatically keep to a fast enough shutter speed for you to hand hold your camera. Yet still allow enough light in to your camera's sensor for a reasonable night shot. As explained in the first section, this would cause a grainy photograph. However, in some circumstances any photo is better than none. 


  • If you want to take photographs in darker situations other than outdoors, without the use of a flash.
For example, if you were taking images in a museum or theatre, camera flash could be prohibited. Or if you were photographing a child blowing out their birthday cake candles. A bright flash could ruin the atmosphere. In this case you would keep the ISO at around 1600. 


  • If you want to take a photograph indoors of a moving subject. 
For example, if you were taking photographs of a basketball game at an indoors sports center. In these circumstances there isn't always enough natural light to take a good photo, while at the same time the players aren't going to stand still long enough for you to shoot at a slower shutter speed either. Therefore, you could up your ISO to 800 or more. Again, this would allow enough light in to your camera's sensor for a reasonable shot.

This was shot with an ISO of 160 on a bright sunny day. Exposure is good and there is very minimal grain in the image. Good quality image. 


I hope you were able to learn something from this weeks "Tips and Tricks". Remember if you have any questions, please feel free to leave a comment and I will answer it as best as I can. 

Challenge: 
Go play with your ISO in different lighting situations and use different shutter speeds to see the difference. If your ISO is too low for the lighting situation, your shutter speed may be to low to hand hold as well. Just play with it and try out different setting options and see what you get. I would love to see your results if you want to share. 
Click here to go to our Facebook page


Have fun playing!!! 

Thursday, January 26, 2012

Tricks & Tips Thursday! White Balance... {Eastern Idaho Wedding Photographer}

Tips and Tricks Thursday

Are you ready to start focusing on the steps to do manual mode in your camera? Today we will discuss white balance- why is it important and how you control your white balance in the camera...

Chapter 2: Manual Mode Settings
Part A: White Balance

White balance is critical in helping your photos to be the "right" color. When you set your camera to auto white balance, your camera is "guessing" what the color range is. Hopefully after todays tips you will understand and know how to set your white balance correctly to achieve the best color possible. 

Proper camera white balance has to take into account the "color temperature" of the light source you are shooting in. Our eyes are pretty good at judging what is white under different light sources but digital camera's often have difficulty with auto white balance and sometime will create unsightly blue, orange, yellow, red or green casts. Understanding digital white balance can help you avoid  color casts and help you to achieve better photos in different lighting situations. 

So for those of you who have been avoiding White Balance – let me introduce you to it. I promise to keep it as simple as possible.

Adjusting White Balance
Different digital cameras have different ways of adjusting white balance so you’ll need to get out your camera’s manual out to work out the specifics of how to make changes. Many digital cameras have automatic and semi-automatic modes to help you make the adjustments.

Preset White Balance Settings
Here are some of the basic White Balance settings you’ll find on cameras:
  • Auto – this is where the camera makes a best guess. You’ll find it works in many situations but it’s worth getting out of it for trickier lighting.
  • Tungsten – this mode is usually symbolized with a little bulb and is for shooting indoors, especially under tungsten (incandescent) lighting (such as bulb lighting). It generally cools down the colors in photos.
  • Fluorescent – this compensates for the ‘cool’ light of fluorescent light and will warm up your shots.
  • Daylight/Sunny – not all cameras have this setting because it sets things as fairly ‘normal’ white balance settings.
  • Cloudy – this setting generally warms things up a touch more than ‘daylight’ mode.
  • Flash – the flash of a camera can be quite a cool light so in Flash WB mode you’ll find it warms up your shots a touch.
  • Shade – the light in shade is generally cooler (bluer) than shooting in direct sunlight so this mode will warm things up a little.

Manual White Balance Adjustments
In most cases you can get a pretty accurate result using the above preset white balance modes – but some digital cameras (most DSLRs and higher end point and shoots) allow for manual white balance adjustments also.
The way this is used varies a little between models but in essence what you do is to tell your camera what white looks like in a shot so that it has something as a reference point for deciding how other colors should look. You can do this by buying yourself a white (or grey) card which is specifically designed for this task – or you can find some other appropriately colored object around you to do the job.
If you are unsure how to custom white balance on your camera check out your owner manual. When I custom white balance on my DSLR I set it to custom WB (white balance), then I take a picture of my grey card (I use an Expo disc) and then I go into my camera menu and click on  "Custom WB". My camera will then allow me to select the image I just took with the grey card (an image that is completely grey). And then I am all set to go. Now  my camera KNOWS what the color spectrum is and my colors will be more accurate out of camera. 

Challenge for the week: 
Take a picture of an object using all the Preset White Balance settings. Then custom white balance with your camera if it allows you to. Then look at all of them on the computer side by side and see the difference in your color casts. As you take images this week, try to remember to change your white balance according to the lighting your in. 

Post to our Facebook Page your results!!! We'd love to see them! 


Thursday, January 19, 2012

Tips and Tricks Thursday! Manual mode {East Idaho photographer}


Tip and Tricks Thursday

Did you work on playing with your aperture (f stops) and shutter speeds last week? I hope you were able to see the difference the f stops make in your depth of field and how important shutter speeds can be, especially in regard to "action" shots. If you didn't have a chance to play with it too much, try some more this week. I believe that if you can understand how the "S" (shutter priority) and "A" (aperture priority) modes work then getting into manual modes will be a little easier. When I first started learning how to shoot a DSLR (digital single lens reflex) camera I played a lot in the "S" and "A" modes and then went into manual mode and plugged in similar settings and then adjusted it to my liking. 

Chapter 1: Learning your camera
Part C: Manual Mode

Manual mode is THE ONLY WAY to have total control of your camera. You tell it EVERYTHING. Once you learn to manual control your camera you will NEVER go back to Auto. I love having the control of telling my camera what I see. 

Because manual control encompasses so many different options I am going to just briefly explain what you can control in this mode and then I will go more into depth on each setting over the next 5 weeks. 

In manual mode you control: 

White Balance: 
This determines the color that your camera "sees". Your camera can be set to Auto white balance or custom white balance. By adjusting the white balance in your camera you are giving your camera a white colour for reference.

ISO: 
ISO stands for International Organization for Standardization. ISO is the method of adjusting the camera’s sensor to make it more sensitive to light. Higher ISO means higher sensitivity to light. Also the higher the ISO,  the greater the noise of the camera will be making your image grainy.  So to keep the noise at bay, you can take a few pictures at different ISO settings and check the resulting noise that you can bear to have.

Shutter Speeds and Aperture:
We will go more into depth on how  the shutter speed and aperture go hand in hand with ISO. 

Focal Points:
Focal points are so important on controlling where your focus is. You tell the camera what you want it to focus on, whether it be in the right corner, left bottom, etc. I love being able to adjust my focal points to get the specific area sharp tack.

Histograms:
If your camera will display a histogram after shooting an image, then you need to take advantage of this feature. By looking at the histogram of an image you can tell if the image was properly exposed or not. I will go into more details in one lesson on reading a histogram to make sure your image isn't under or over exposed.   

Thursday, January 12, 2012

Tips & Tricks Thursday! Semi-Auto mode {East Idaho Wedding Photographer}

Tips & Tricks Thursday

So how did you do on your challenge from last week? Did you play around with the different auto modes and experiment with what they could do? I hope it helped you to understand each icon on your dial a little better. 

Today we will be addressing the other side of the dial- the semi-automatic mode. Now- some of your point and shoot cameras will  allow you to do semi-automatic mode, but some will not. You will need to double check to see what your particular camera can do. If it isn't on a dial, it may be in your settings.

So are you ready for today's lesson? Well, here we go! 

Lesson 1: Learning your camera
Part B: Semi-Automatic

Today I am going to explain three semi-auto functions.
1. Program Mode (P)
2. Shutter Priority Mode (S)
3. Aperture Priority Mode (A)

I will also post samples of effective use of these modes and ineffective use. The images I am sharing were taken last fall on a cruise I took with my Mom at one of our ports- St. Maartan. My Mom and I had the privilege of having a street vendor make us a basket from palm tree leaves. 


1. Program Mode:
Some digital cameras have a priority mode in addition to the auto mode. In cameras that have both, Program mode is similar to Auto, but gives you a little more control over some additional features including flash, white balance, ISO, etc. Check your digital camera’s manual for how the Program mode differs from Automatic in your particular model. In fully Auto mode you can not adjust for white balance and ISO (don't worry if you don't know what ISO means. We will address this in future posts. But it basically means the sensitivity of the image sensor in your camera.) but in Program mode you can. Program mode is just a basic small step up from Auto and can be helpful if your lighting is low because you can raise the ISO higher in low light situations. It is also helpful in this mode to be able to tell your camera what the white balance is instead of your camera attempting to figure it out on its own. 

2. Shutter Priority Mode:
In Shutter Priority mode you will set the shutter speed and the camera will choose the other settings for aperture, ISO, white balance, etc. Being able to set your own shutter speed is useful especially when taking action photos. The more you want to "freeze" the image the higher the shutter speed needs to be. It is also fun to set the shutter speed lower to capture flowing water or a large scenic view. When I am doing a family session I keep my shutter usually around 125. This enables me to hand hold my camera and still not get blurry images if someone moves just a little. If I have a lot of wiggly kids I will even bump it higher. One of the disadvantages of this mode is that the camera will try to set your ISO and aperture for  you and if the lighting situation isn't good you will struggle with getting properly exposed images. 

Here is an example of not enough shutter speed. The image is blurry because the shutter didn't close fast enough to "freeze" the motion. He was spinning these palm leaves so fast that I should have upped the shutter speed. But in this case I wanted the motion blur to show how fast he was spinning it. So depending on what you are going for in your image, you may want to "freeze" the motion or allow the motion to "blur". And both can be achieved by playing with your shutter speeds. 

This image was taken at the same shutter speed but his hands weren't moving as fast in this image and so there wasn't as much blurring. 


3. Aperture Priority Mode:
This mode is really a semi-automatic (or semi-manual) mode where you choose the aperture (often referred to as a "f stop") and then your camera chooses the other settings (shutter speed, white balance, ISO etc). Aperture priority mode is useful when you’re looking to control the depth of field in a shot. Choosing a larger number aperture means the aperture (or the opening in your camera when shooting) is smaller and lets less light in. This means you’ll have a larger depth of field (more of the scene will be in focus) but that your camera will choose a slower shutter speed. Small numbers means the opposite. This takes a little to get used to but once you do, it makes taking images fun. Especially if you are in a situation where there is a lot of "extra" stuff going on in the background. If you use a small number, the focus will be on the subject and all the background chaos will be blurred. 

I chose to show this image for two reasons: 
One- the shutter speed was fast enough to "freeze" the motion of his hands and 
two- check out the great depth of field. This was achieved because the aperture was low enough to focus on the subject only which then blurred out the background. 


Here is the finished basket! Here again the f stop was f4 and because of the small aperture the depth of field is awesome! 

One last image- 
This is a great example of when you want a higher f-stop and a higher shutter speed. If the f-stop would have been small the whole image would not have been in focus.
So always remember- MORE image in focus- higher the f stop and smaller area in focus the smaller the f-stop.


I hope you learned a lot from todays Tips &Tricks. Next week we will get more into manual settings and how they all work together. 
See you next week!!! 

Challenge for the week:
Get out your camera and play with the "S" and "A" modes. Try different scenarios. Do some with movement and do some where you work on your depth of field. 


Make sure to post any images to my Facebook page! I'd love to see what you come up with! 


CLICK HERE TO GO TO OUR FACEBOOK PAGE


Thursday, January 5, 2012

Tips & Tricks Thursday- Get better photos out of your camera {East Idaho Family Photographer}


Do you have a camera and get frustrated that your pictures don't turn out like you'd like?

 Well guess what?...

This year I have decided to do a "Tips & Tricks Thursday" every week to help you learn your camera better. These tips can be applied with any camera, but especially ones that you are able to change settings manually.  If you have a specific item you want to learn about feel free to send me an e-mail or leave a comment on this Blog and I will make sure to include what you want to learn in one of the "Tips & Tricks" lessons.  I will be teaching you how aperture (or often referred to as "f-stops"), shutter speed, ISO, white balance and focal points all work together to create better images. The most important thing for you is to take what I teach and go try it and "play" with your camera until you get it down. I also would love to have you post your images on my Facebook page where I can give you additional advice on how to make the image better or answer any questions. Please post your images to:

These lessons are for beginners, amateurs and even those who know their camera really well. You never know what you might learn that you didn't know before!

Lesson 1: Learning your camera
Part A: Auto Settings

One of the most important parts to getting an amazing image is knowing how to work your camera. When you leave your camera in "auto" mode you are allowing your camera to "guess" at everything- the lighting, the shutter speeds, the focal points, the white balance, etc. That is why, when shooting in auto, you get some images that turn out great and others turn out horrible. If you want more consistent images you need to learn how to "tell your camera" what you "see".  Every camera, whether it is a point and shoot or a dslr, allows you to change settings so that your camera can "see" correctly. Today we will address the different "auto" settings and explain how they work. Next week we will address semi-automatic modes and the third week we will start into the manual mode. 

Every camera has setting options, whether it is in your menu or on a dial. This is an image of a typical dial. 


Everything to the right of the image is "auto" settings and everything to the left is semi-auto and manual. So lets talk about the settings on the right. 

The first setting (highlighted in green) is Auto mode. 
 By selecting this setting you are allowing the camera to make best use of the aperture, shutter speed, ISO, focus and the flash. SO basically you are allowing the camera to "guess" what type of shot you want. This can result in a hit-or-miss image. Sometimes the camera may "guess" right on, but more often than not the camera screws up and your image is not what you were wanting. 

The second setting is Portrait mode.
The camera will adjust itself to a large aperture (or f-stop, usually a small number) so that the background remains out of focus and your subject is the focus. You can get beautiful portrait shots when you stand close to or zoom in on the subject before taking the shot. Your camera is still "guessing" but it tends to give you an image where the subject is more center of attention. 

The third setting is Landscape mode.
This is great if you want to cover a large area in the shot, mainly landscape images. In this mode, the camera selects a small aperture (f-stop, usually a large number) in order to capture a large scene that is all in focus. It is best to use a tripod if possible to make sure the photo is not shaken or blurred, especially if the lighting is low. 

The fourth setting is the Macro mode.
This mode works best when you want to move in closer and take shots of flowers, insects or tiny objects. Focusing is harder in macro mode as the depth of field is very narrow at short distances. This mode does tend to have a smaller shutter speed so a tripod may be useful in order to not blur the image.

The fifth setting is the Sports mode.
In some of the cameras, this mode is also known as ‘action mode’ as capturing sports mostly means taking pictures when the subject is in action or is moving. The shutter speed is fast on this mode which allows for the camera to "freeze" the subject while in action. 

The sixth and seventh settings are the Night modes.
Your camera uses a longer shutter speed (meaning the shutter stays open longer) in order to capture details of the scene when light is low. A flash is usually used in this mode to allow more light on your subject. While it is better to use flash in the dark, taking pictures without the flash also brings out good shots and makes for  interesting images. A tripod is highly recommended for this type of image. When the shutter stays open longer any movement on your part will blur the image resulting in a poorly focused image. The mode with the body and star allows your camera to light up the subject with a  flash and focuses on the subject. 
Challenge:
So now that I've explained all the "auto" modes my challenge to you is to go try them all for what they are specifically suppose to do. Try an action shot on a moving subject. Try a night shot using a tripod. Try portrait shot and see how it blurs the background (referred to as depth of field). Just go play with all the different auto modes and get familiar with them more. Post your images on my Facebook page! I'd love to see what you capture. Now go have fun! :)